NBP Freqsep Control Plug-in for Photoshop Win & Mac
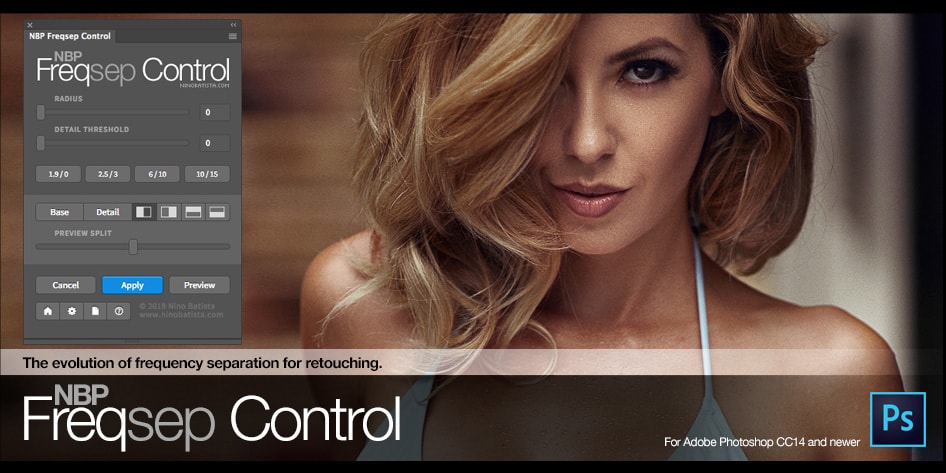
The Evolution of Frequency Separation for Retouching
If you’re familiar with the process of utilizing frequency separation in your retouching workflow, then you’re probably aware – and frustrated by – the lack of total control and somewhat average results you get while using it. While the method remains a skin retouching staple, the core approach to setting it up in Photoshop has been more or less the same for a while now, and accepted as such.
The basic premise of frequency separation is creating the ability in Photoshop to manipulate the base colors and textures separately, thus giving you the control to perfect skin tone without obliterating skin texture. On paper, this sounds to good to be true. For many retouchers, the discovery of this method is initially exciting, and then eventually discouraging due to the limitations of the classic frequency separation setup process.
Then add in the workflow slowdowns while processing the filters and other functions involved in the setup, and frequency separation becomes a necessary evil, perhaps, but one that leaves you feeling a little flat about your results.
But what if you could have a bit more control, all in one panel, and achieve better results? Perhaps you have higher demands in your retouching, and are always looking to step it up. Accepting and implementing what everyone else does is only going to get you so far. This is where Freqsep Control comes in.
Ultimate Control for High-End Retouching
- Set Radius (blurring/smoothing) and Detail Threshold (edge preservation) to tailor it to for your preferred look, image resolution, and workflow in an intuitive and efficient user interface right inside Photoshop as an Extensions panel
- Proprietary 32-bit edge preserving and blur algorithms are high quality and process faster
- More texture preservation than typical frequency separation methods in Photoshop, which allows you far for more freedom while perfecting transitions
- Minimizes haloing problems common in frequency separation setups
- Allows you to preview Base (low frequency) and Detail (high frequency) results in split view or individually before applying to ensure you get the results you want
- Choose to have the panel duplicate or absorb your working layer
- Faster than traditional frequency separation process setups
- Save up to 4 presets for efficient multiple workflows
My recommended retouching workflow:
- Healing and object removal
- Dodge & burn
- NBP Freqsep Control
- Liquify (if needed)
- Color correction
- Color grading (ideal time for NBP Lumizone)
- Finalizing
The most texture preservation with the smoothest results, all with absolute control.
- A Plug In Solution
Extends beyond other plugin panels by utilizing proprietary algorithms (blurring and edge detection) which are faster and higher quality than what is built into Photoshop. - Active Previewing
View results of Low and High frequency layers according to the settings in real time.
Adjust settings on-the-fly to your preference or to the ideal parameters for your files. - Edge-preserving separation of low frequency layer
Blazing fast implementation of proprietary edge preservation (Detail Threshold) combined with high frequency removal / smoothing (Radius)
Faster, smoother, and higher quality than Photoshop’s surface blur and gaussian blur traditionally used in frequency separation.
Actively adjust both parameters simultaneously to tailor the exact type of frequency separation you need and want.
Dial up more smoothing (blur) for your Low frequency layer while previewing in detail to avoid over haloing near high contrast transitions. - Seamless application of high frequency layer
More texture is preserved than in traditional frequency separation.
Affords you freedom to more intensely add color under texture to smooth out transitions without sacrificing it as much. - Works with your existing frequency separation workflow
Whether you prefer to directly modify the Low or High layers (healing on High, mixer brush on Low, etc) or add color in between Low and High layers without directly modifying them, your frequency separation workflow will remain unchanged. - HTML5 native Photoshop UI panel
Intuitive and efficient, easy to understand user interface built for effective workflow. - Multi threaded and vectorized code
The algorithms are implemented to take advantage of modern CPUs for a real time experience. - Internal 32 bit calculation
Works with 8, 16 and 32 bit images.
Less artifacts, less quantization.
Both Windows and Machintosh version have been given. Haven’t tested in Mac.
[button-red url=”https://www99.zippyshare.com/v/FOvp90Cx/file.html” target=”_blank” position=”center”]Download from Zippyshare [61.91 MB][/button-red]
[button-green url=”https://intoupload.net/z6vijg0ccyyn” target=”_blank” position=”center”]Download from IntoUpload [61.91 MB][/button-green]
