Aescripts Time Bend v1.0 for After Effects Full Version for Windows Free Download
Time Bend aims as a better replacement for the Time Displacement effect in After Effects. The main difference is more versatile control over the frame sequence, blending with editable transition, loops support, or animating time mapping via curve phase..
How it works
The Time Bend plugin distorts footage by combining multiple frames of the same footage from different times relative to the current frame. We can divide a set of parameters into three main sections: frames on the timeline, transformation of mapping source, and blending options.
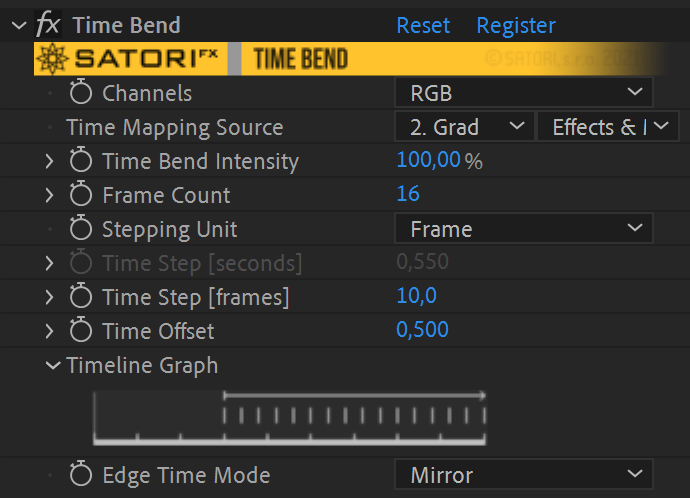
The plugin’s main parameter is frame count, which defines how many frames are combined. Another one is the time step, which determines distances between the frames on the timeline. You can specify this sequence in a forward or backward direction using a preferred stepping unit: frames or seconds. By default, the sequence of frames starts from the current frame, but by using time offset, you can also alter that. Edge time mode is a handy parameter, which controls how to handle frames out of the layer’s boundaries, which is especially useful when applying to a looping layer and producing seamless output.
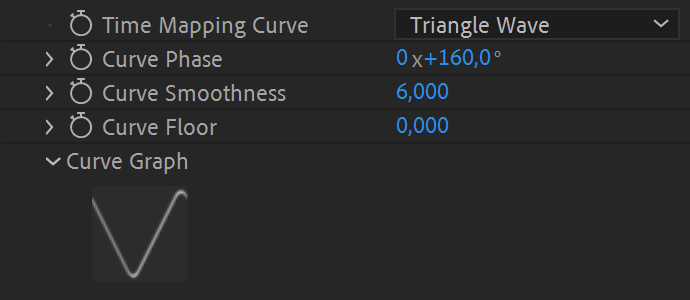
The current frame is a time-mapping source by default, but you can also select other layers. Time mapping source serves the purpose of a blueprint mask in what order frames from various times are blended. Black pixels map the first frame in the sequence and white the last one, a gradient between controls transitions between corresponding frames. You can use Time Bend in Luma channels mode, where combined RGB values define the distribution, and the plugin works on whole pixels. Each channel is calculated separately according to its component values in RGB mode and is applied to RGB channels one by one, creating more complex output and new color combinations diverging from the original footage. The time mapping source is, by default, treated without any transformation linearly (from black to white). However, you can choose from other curve shapes, which allow distributions other than linear, or change the curve’s phase, which is handy for animating the mapping source mask.
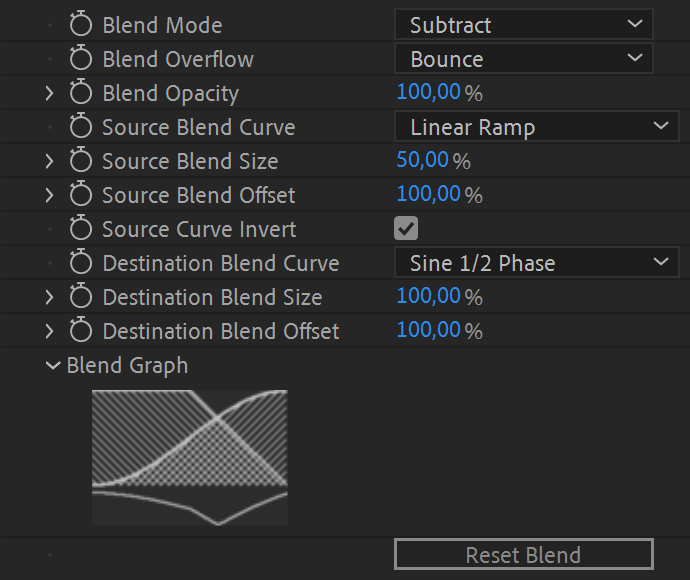
The last section of Time Bend’s parameters is devoted to actual frame blending. The default settings perform linear crossfade transitions from one frame to another without color deviations or shading. But suppose you want to transform the output colors shading according to the mapping source. In that case, you have several transition curves to choose from and other parameters to set up the transition’s curve distance or position offset, which along with selectable blending mode and blending overflow strategy, gives an extensive set of options to tweak.
Time Bend is one of those experimental plugins, where visual outputs can’t be that easily imagined or pre-planned. Also, a large set of parameters needs some visualization to understand the settings conveniently. Therefore, each section of the plugin features a graphical UI element, which gives you feedback about your parameter changes in the form of a graph and hopefully will serve as a great helper while exploring the possibilities of Time Bend. Have fun!
Usage Hints
- It’s advisable to use 16/32-bit color modes to maintain as smooth blending between the frames as possible. Especially if you use custom gradients for the Time Mapping Source.
- When applied to the text layer, which is animated, the effect is applied in the current frame boundaries only. To solve this, apply the effect in the adjustment layer and place a solid background below the text layer – that way you ensure application to the whole screen space.
- Sometimes After Effects can’t detect invalidation of frames in RAM preview cache when using the filter in the adjustment layer. Happens most often with using solid layers and images. In order to see the latest result without any misleading frames from the previous state, please clear RAM preview cache. Clearing cache might be also needed, after changing sub-composition and the parent composition might not update all frames correctly.
Parameters Guide
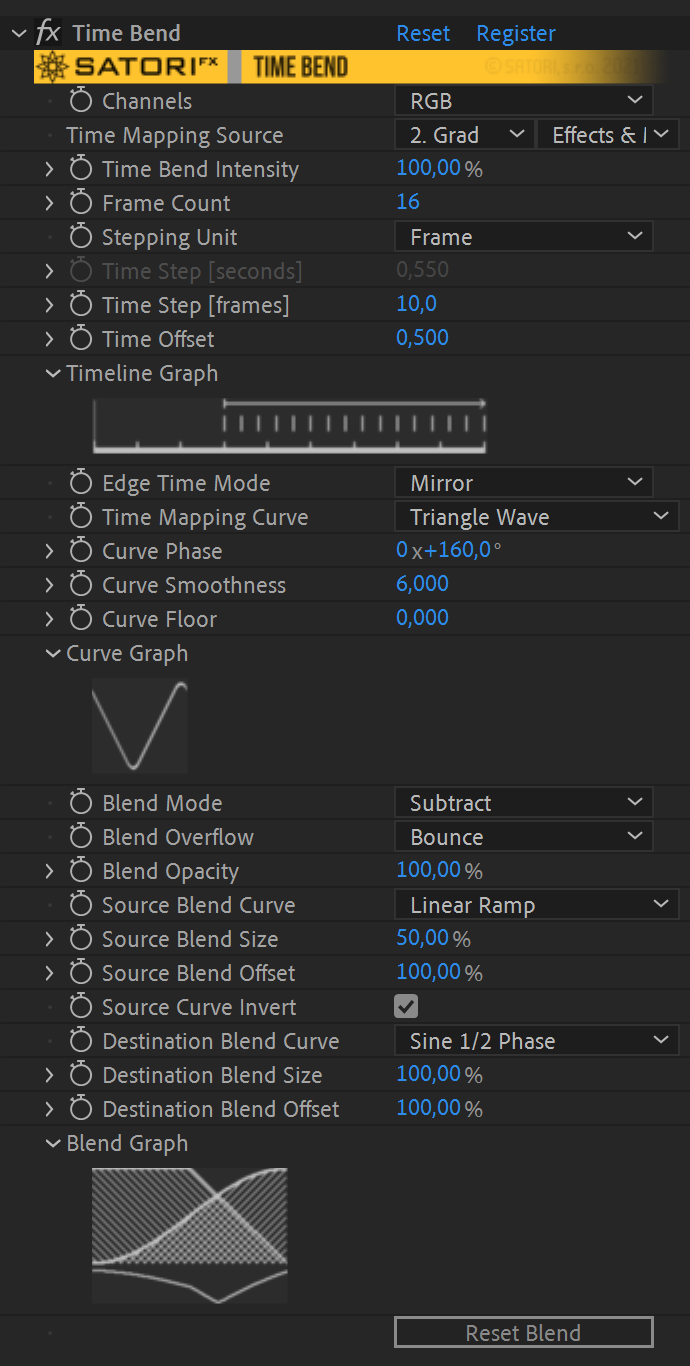
- Channels – allow you to specify which color channels should the effect be applied to:
- Luma – the effect is applied to all channels equally using the overall luminance of a pixel.
- RGB – the effect is applied on each of the RGB components separately.
- Red, Green, Blue, Alpha -the effect is applied to selected component only.
- Time Mapping Source – controls by luminosity of pixels how frames blending is distributed over the frames sequence. The mapping is ordered by the lightness of the pixels, with the darkest corresponding to the beginning and the lightest to the end of the frames sequence.
- Time Bend Intensity – controls the general intensity of inter-frames blending. However, when the value is set to zero, the first frame from the sequence is displayed instead of the actual frame. In most cases, it’s the same as the current frame, but by using the Time Offset parameter, it can be altered.
- Frame Count – sets the number of frames on the timeline you wish to blend. Values above 32 start to become inconvenient for reasonable preview and render times, but still, you can experiment with up to 256 frames.
- Stepping Unit – the options Second and Frame specify which Time Step parameter is in use. Sometimes the precise stepping by number of frames is preferred, while control by time step in seconds guarantees stable stepping even when the FPS of the composition is changed.
- Time Step [seconds] – specifies time step per each frame in seconds from negative (backwards) to positive (forwards) values. Zero causes the plugin to perform a blending operation on the current frame (and its speed is optimized for this scenario).
- Time Step [frames] – specifies time step per each frame in number of frames and ranges from negative to positive values. Please keep in mind it’s in relation to your actual composition’s FPS. The same applies for zero value as for time step in seconds.
- Time Offset – allows shifting backward or forward in time in a previously defined range of frames. The offset unit is determined by the length of the frame sequence (defined by Frame Count and Time Step). For example, the time offset value of 1 moves the sequence of frames forward in time for the exact length of itself.
- Timeline Graph* – provides an overview of where your defined frames lie relatively from the actual frame, including order direction. For better orientation, frames (given by FPS of the composition) and seconds are depicted at the bottom.
- Edge Time Mode – defines a strategy for handling access of frames outside the applied layer content boundaries. Repeat Last picks the first or the last frame. The Wrap option behaves as if the layer was extended before and after it by new copies of itself, which is ideal for looped footage. Setting Mirror acts as if the layer is extra copied before and after in the reversed direction.
- Time Mapping Curve – this is what Time Bend uses to map input pixel luminosity from the mapping source to the resulting frames blending distribution. All the parameters in the Curve section are set to perform no input value change by default. Other configurations allow experimentation with the transformation of the input luminosity values through one of the following functions:
- Channels – allow you to specify which color channels should the effect be applied to:

- Curve Phase – offsets the curve by a set amount of degrees.
- Curve Smoothness – helpful for smoothly connecting the beginning and the end of discontinuous curves (linear ramps and exponentials) or smoothing out a triangular curve.
- Curve Floor – defines the minimum of the mapping curve.
- Curve Graph* – visualizes the curve mapping for your visual reference.
- Blend Mode – sets the math operator for calculating transition from the frame to the next one in a sequence. All the blending parameters are set to defaults that provide a smooth crossfade from one frame to another. Tweaking blending parameters will create a transformative look in the color space, and you have extensive control over applied blending curves. The following blending modes are available:
- Addition – is a blending mode that adds source and destination pixel values in RGB colorspace.
- Subtract – is a blending mode that subtracts destination pixel values from source values.
- Multiply – blends source and destination by multiplication of RGB pixel values.
- Divide – is an advanced option for more experimental or glitch outputs where source pixel values are divided by destination values.
- Blend Overflow – defines how to handle situations when the resulting value from the blending operation is beyond the pixel’s specified minimum or maximum.
- Clamp – uses a minimum or maximum value when the result exceeds the valid range. Overflow usually results in saturated or dimmed colors.
- Bounce – mirrors back the value for the amount exceeding the valid range. Bounce is helpful for continuous transitions, where you can use overflow to shade the output according to the time mapping source and blending curves used.
- Overflow – flips the value as it starts from the other side of the range for the amount it exceeds. It creates non-continuous blending if overflow is present, which might be used for more rough visuals.
- Blend Opacity – is the parameter to control the amount of blending applied. For the value 0%, time bend is applied to whole frames only, and no transition blending is used. Keep this value to 100% until having a deeper knowledge of the entire blending section. Low values around 10% might be helpful when working with Divide blend mode, as the complete result might be too noisy, but when applied only slightly, it might bring the right bit of noise to your visuals.
- Source Blend Curve – defines the curve shape used to shade source pixel values in the blending transition. Curves for source shading are, by default, in the falling direction.
- Linear Ramp – creates a linear falling of a curve.
- Sine ½ Phase – creates a smooth start and end of a curve.
- Sine ¼ Phase – has linear properties to start and smooth to end of a curve.
- Triangle – creates a linear falling in the first half of the curve’s interval and a linear falling in the second half.
- Sine Full Phase – creates a smoothed version of the triangle shape with fine easing.
- Source Blend Size – defines how much of the transition distance is used for the curve progress. The curve’s first and last values apply to values outside the interval.
- Source Blend Offset – sets the offset of curve progression in transition interval if blend size is smaller than 100%. A small tip for creating a square curve: Set Blend Source to Linear Ramp, Set Blend Size to 0%, Use Blend Offset value to position square rise/fall.
- Source Curve Invert – flips the direction of the source blend curve from falling to rising. It’s helpful while operating with more advanced blend modes such as Multiply or Divide.
- Destination Blend Curve – defines the curve shape used to shade destination pixel values in the blending transition. Curves for destination shading are in the rising direction, and the same set of types is available for Source Blend Curve.
- Destination Blend Size – defines how much of the transition distance will be used for the curve progress.
- Destination Blend Offset – sets the offset of curve progress in transition interval.
- Blend Graph* – is a convenient way to understand and control the tweaking of all blending parameters. The graph consists of two sections. The top part depicts how both source and destination shading curves overlap and progress in the transition interval. The bottom part shows how the selected blend mode operates with the current overflow mode. This way, you can control designing your transition and see if overflow is present or if selected options create a smooth transition.
- Reset Blend – this button initializes all the blending settings to their default values to create a smooth linear crossfade transition from source to destination.
* The graphs are not available in CC2014 or earlier.
Aescripts Time Bend v1.0 for After Effects Full Version for Windows Free Download
https://zeroupload.com/94bd695fffeb99877ac3ae00b350e50a
https://www83.zippyshare.com/v/5TOAlGiY/file.html

